
Henna (otherwise known as Mehndi) are temporary body tattoos that originated from ancient India, Egypt, Africa, and the Middle East, dating back to as far as over 5,000 years ago. They’re mostly worn on the hands and feet during festive celebrations, such as engagements and weddings. Particularly, in traditional Indian folklore, it is believed that the darker the henna, the stronger the bond between the husband and wife. Despite how intimidatingly intricate they look, henna can be broken down by isolating each pattern and detail. Here are some simple henna designs for beginners to try, along with some tips and tricks on application and maintenance.
How To Practise Applying Simple Henna Designs On The Hands For Beginners (Tips & Tricks)
You should first make sure that the henna you’re applying is real, all-natural henna paste. If you’re making your own henna paste, it must be fully made from 100% authentic and pure henna powder. Otherwise, you can purchase ready-made organic henna cones from a credible store. For the latter, remember to check the ingredients used in their paste to ensure that it’s safe to use. Avoid “black henna” at all costs. They have a high content of chemical dye, specifically paraphenylenediamine (PPD), which can cause chemical burns and allergic reactions, scarring the skin.
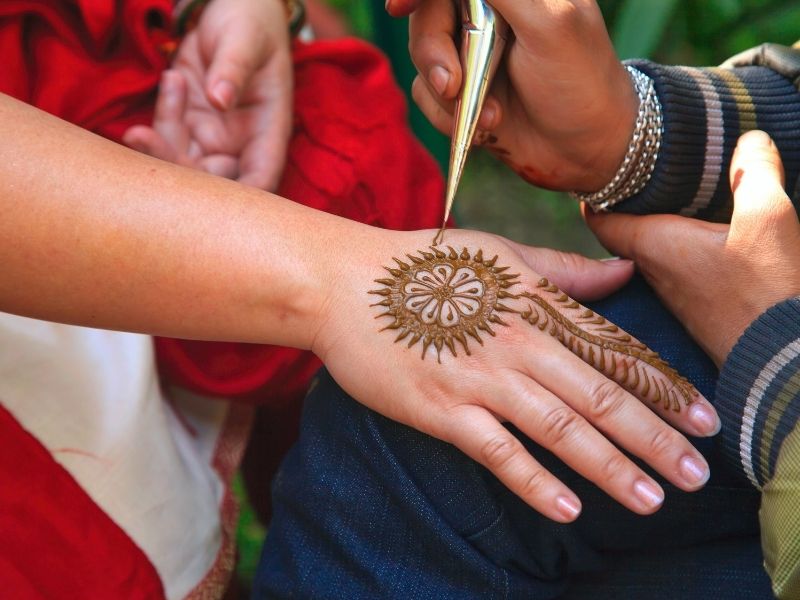
As henna tattoos can last up to three or four weeks, it’s best to start practising applying your henna onto a clear acrylic sheet (plastic is fine too) first. Have a printed copy of the henna design you like for reference and tissue paper on hand to clean up any mistakes. Once you have prepared the materials, just follow the instructions below:
- Put the printed henna design underneath the clear sheet so you have a guide to trace with.
- Squeeze a little of the paste from the cone onto the tissue paper till you get a light and soft, brownish colour.
- Continually clean the tip of the cone with the tissue paper for a neater application.
- Then follow the printed design and trace the henna onto your clear sheet.
- Wipe away any mistakes with your tissue paper and keep practising till you get the hang of it.
Once you get used to the application and your designs are no longer messy, you can then begin drawing your designs without tracing. Outline your hand onto the A4 paper and place it beneath the glass sheet. Have your printed design next to you for reference, and start applying your henna on the glass sheet. After you’ve mastered this stage, you can finally start applying henna on your hand. If you’re still not too confident, draw out the design on your hand with white eyeliner, and trace it accordingly.
Simple Henna Designs For Beginners To Try
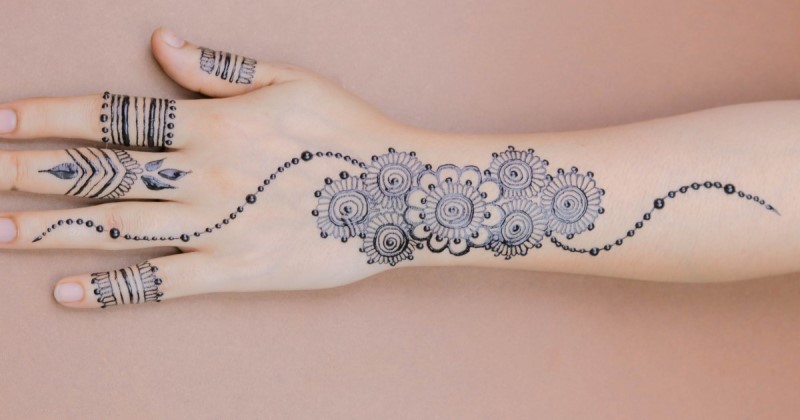
Flower Henna
Flowers symbolise happiness, joy, beauty, and new beginnings. They’re one of the most simple henna designs for beginners to start with. Patterns can be added onto different layers and textures through leaves, petals, or windy branches the more you get used to applying the dye. You can start with a basic circle with a slight swirl at the centre of your palm for the base. After that, it’s all about experimenting with how big or small you want your petals to be. However, if you’re new to henna, then it’s better if you practise with bigger outlines first.
Minimalist Modern Geometric Henna
Another simple henna design for beginners to practise is geometric shapes. Modern henna artists, like Azra Khamissa, are adopting a minimalist approach for a subtle, trendy spin to the traditional art. It’s less detailed and ornate, leaving plenty of skin uncovered as the patterns are more spaced out. This will allow you to master your basics in a simple way. If you’re intimidated by the number of steps it takes to create a traditional motif, then this style is for you. Try out block prints, as well as large squares and circles in varying thickness and sizes.
Heart-Shaped Henna
You can never go wrong with classic, heart-shaped henna for that simplistic feminine flair. They’re a simple enough henna design for beginners but are just as beautiful. Draw your hearts like how you normally would with two comma-like strokes that close at the end and build your piece from there.
Vines & Leaves Henna
Vines and leaves are another common simple henna design that’s good for beginners. They are usually placed on the fingers, representing longevity and strength. Furthermore, at weddings, these designs symbolise a long-lasting love and fidelity to one’s partner. Let these patterns flow seamlessly in graceful curves and swirls that trail down elegantly towards the fingers. Then, proceed to decorate the vines with teardrop petals and leaves.
Easy & Beautiful Mehndi Design
Ready to take your simple, beginner-friendly henna designs to the next level? This easy Mehndi design combines a few patterns from the aforementioned videos. Once you’ve had enough practice and are confident enough doing those patterns individually, you can apply them all together to create this beautiful, expansive masterpiece on the front of your hand. You’ll definitely get compliments during Deepavali with this one!
How To Make Your Henna Last Longer: 6 Tips To Know
- Don’t wax, shave, or scrub for two days before the henna application. Also, avoid any moisturisers, lotions, or any hydrating products during this time and don’t exfoliate your skin. This will allow your henna to soak in more evenly.
- Prepping your skin properly before applying the henna is an important step that ensures your henna will last longer. So, as the first step, make sure to wash your hands with soap and water. After that, get a cotton ball and rub the skin with a bit of alcohol to remove the body’s natural oils.
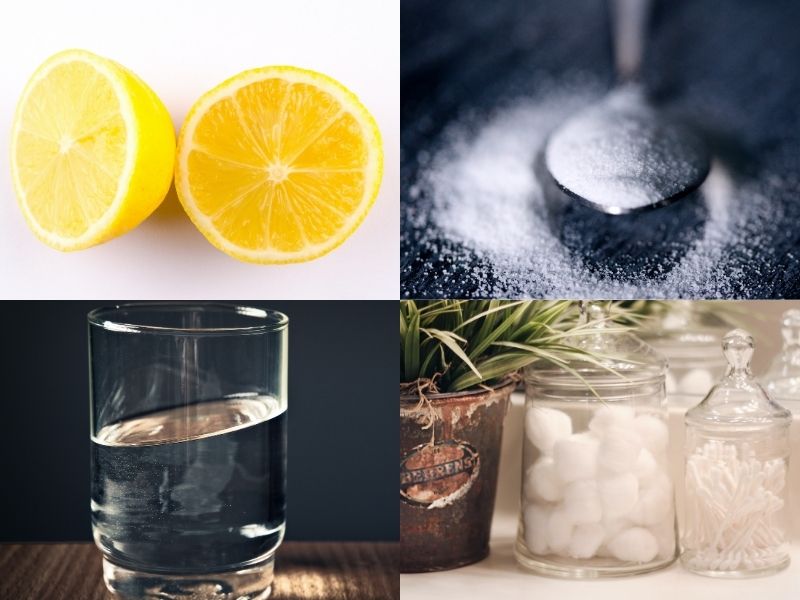
- Once you’ve applied your henna and allowed it to dry, it’s time to bring back some moisture to the skin. Mix one tablespoon of lemon juice, one teaspoon of white sugar, and water, and spread it onto the design. It increases the acidity of the henna while hydrating the skin, which will help the henna further absorb into the skin.
- Repeat this step a few times whenever the henna dries out. When it’s time to remove the henna, boil some water and expose your hands to the steam. This will also ensure the colour seeps into the skin more deeply, allowing your henna to last longer.
- Let the henna paste sit longer on your skin, ideally for about 4 hours minimum, and don’t let it come into contact with water. Even when it’s time to remove the henna, don’t use water, because it prevents the dye from penetrating into the skin. Use a blunt butter knife or sturdy card to scrape it off instead.
- Once, you’ve removed the dried paste, apply a mixture of lime juice and oil. This will enhance the colour and make it richer.
Practise These Simple Henna Designs For Beginners To Get Ready For Deepavali
Deepavali is coming up soon, and we hope this guide will help you hone the craft of henna tattooing just in time to rock your simple henna designs for the occasion. Every beginner struggles at the start, but practice makes perfect so continue to keep at it!
Wearing a traditional saree this year and wondering how to tie all that fabric? Get to know these 10 different saree draping styles and give your favourite design a go! If you’re keen on learning how to make Deepavali snacks like murukku from scratch, be sure to check out these delicious homemade murukku recipes too. Need an entertaining watch to get you into the Deepavali spirit? Catch Shopee’s hilarious yet heart-warming short film, Deepava-LIT, with the family!