Easter Sunday is approaching and there’s one arty activity the kids will be looking forward to: Easter egg decorating. But instead of buying ready-made colouring and dyeing kits from the store, why not try applying various creative techniques and using homemade craft materials for a change? Plus, it’ll make for an egg-cellent family project! Below, we round up some of the most colourful, eye-catching Easter egg designs that kids of all ages can DIY with ease.
What eggs to use: Besides using regular hard-boiled eggs, you could also opt for wooden or foam eggs, as instructed by the respective tutorials.
Easy And Fun Easter Egg Designs For Kids To DIY
Marker-Dyed Easter Eggs
Here’s a fool-proof Easter egg design that’s fairly simple for the kids to do and yet, would yield some beautiful results. No fancy supplies needed, other than a few regular household items and basic stationery. Moreover, the kids will be able to draw their designs on a flat paper towel, which makes things fuss-free for any age group.
Supplies you’ll need:
- Coloured markers
- Kitchen towel
- Vinegar and water mixture in a spray bottle
- Rubberband
3D Polka Dots
Take regular polka-dotted Easter egg designs to the next level with this 3D version. The key item you’ll need to create the raised dots texture is fabric puffy paint, as it’ll harden up once it dries. Pro tip: Make sure to do one side (either top half or bottom half) at a time, and only move on to the next side once the first side completely dries.
Supplies you’ll need:
- ½ cup boiling water
- 1 tsp vinegar
- Batik dye
- Fabric puffy paint
Galaxy Easter Eggs
For an intergalactic aesthetic, try this Easter egg design that’s inspired by outer space. Though it has a black-hued base, adding in all the different colours is where the fun (and cool) part comes in. Your kids will get to create the Milky Way, shining stars, and other constellations by dabbing and splattering paint all over the eggs!
Supplies you’ll need:
Washi Tape Easter Eggs
Here’s another relatively easy Easter egg decorating idea because all your kid would have to do is just cut and paste. After all, washi tapes already come in a multitude of colourways and patterns, so half the work is already cut out for you. In this particular tutorial, it features seven different ways to dress up Easter eggs using washi tape.
Supplies you’ll need:
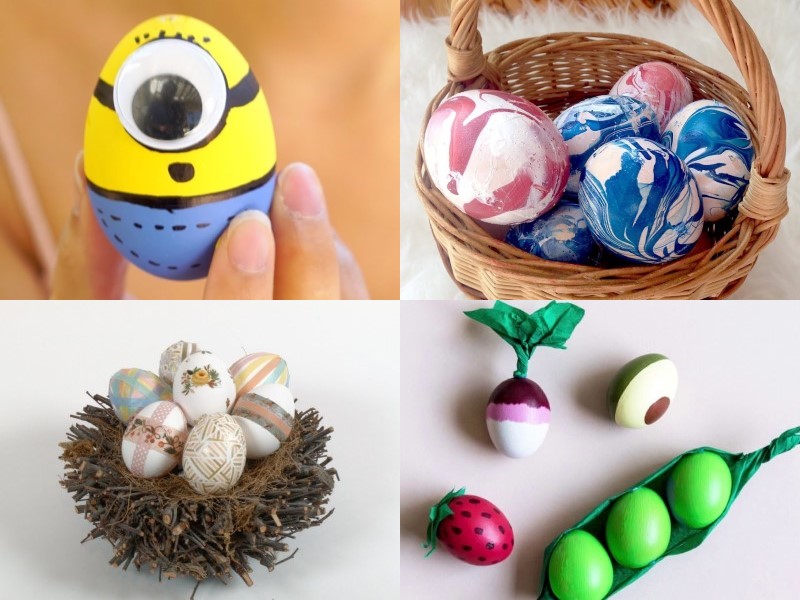
Painted-On Fruit & Vegetable Eggs
Just because Easter eggs are well, eggs, doesn’t mean they can’t be transformed to resemble other foods. Case in point? This Easter egg design that turns them into adorable fruits and vegetables like peas in a pod, avocados, radishes, and strawberries. Just remember that they’re not exactly edible, okay?
Supplies you’ll need:
- Paint
- Crepe paper
- Hot glue gun
- Markers
- Scissors
Cactus Easter Eggs
Besides transforming Easter eggs into other foods, your kids can also turn them into plants, like this cactus design for instance. A few coats of green paint in varying tones, black and white markers to draw in the patterns, and a small terracotta pot is all you need. Once done, these cute little succulents would definitely liven up your space (even long after Easter)!
Supplies you’ll need:
- Acrylic paint
- Paintbrush
- Black and white marker pens
- Crepe paper
- Scissors
- Hot glue gun
- Small terracotta pot
- Shredded paper
Marbled Effect Using Nail Polish
Just like the magic milk science experiment for kids, the same technique is applied for this Easter egg design but using nail polish instead. Use one monochrome hue as per the video tutorial, or let your kids go crazy by mixing several colours together to create a striking marbled masterpiece. Not only is it a fun way for kids to dip, dye, and decorate their Easter eggs, but they’ll simultaneously learn a little bit about science too.
Supplies you’ll need:
- Container with warm water
- Egg holder
- Nail polish in various hues
- Toothpick
- Gloves
Metallic Flash Tattoo Easter Eggs
For a bohemian flair and a hint of shine, try this Easter egg design that utilises temporary flash tattoos. Allow your kid to pick out their favourite metallic designs, then just cut out the patterns, and place them on the eggs (make sure the design faces inwards). Once it’s been soaked in water, all that’s left to do is remove the sticker and voilà!
Supplies you’ll need:
- Flash tattoos
- Water
- Scissors
- Sponge
Neutral Eggs + White Paint Pens
If you prefer to keep the au naturel look of regular earthy-brown and/or white eggs, this is the perfect Easter egg decorating tutorial for kids that can be done almost instantly. It also only requires a couple of paint pens, in contrasting hues like white and metallic, so they stand out against the eggs’ natural base colour. Plus, drawing a few simple lines and shapes is enough for the eggs to stand out.
Supplies you’ll need:
- White and metallic paint pens
Emoji Easter Eggs
Are your kids and tweens often tickled by the plethora of emoji expressions? Have them decorate their Easter eggs to mimic their favourite ones with this easy DIY tutorial. It’s an effective way to get them off their phone and tablet screens too!
Supplies you’ll need:
- Acrylic paint
- Painting sponge
- Marker pens in black, light blue, red, and pink
- Paintbrush
Minion Easter Eggs
If your kid has a love for these high-pitched yellow creatures dressed in dungarees, then this Easter egg design will get them egg-cited for some arts and crafts. Got a few children who are about the same age? Why not turn this activity into a healthy competition to see who can recreate the Minion characters Kevin, Bob, and Stuart best?
Supplies you’ll need:
- Paint
- Paintbrush
- Googly eyes
- Black sharpie marker
Let Your Kids Have Fun Decorating Easter Eggs With These Clever Designs
Decorating Easter eggs doesn’t have to be boring with run-of-the-mill dye kits; nor does it have to be a stressful affair with challenging DIY tutorials. The Easter egg designs featured in this list are some prime examples that it can be a fun, simple, and quick activity for children to enjoy. The bonus? Their creations will add a cheery vibe to your home for the festivity! For more creative projects to hone your little one’s inner Piccaso, give these easy crafts for kids a try.