

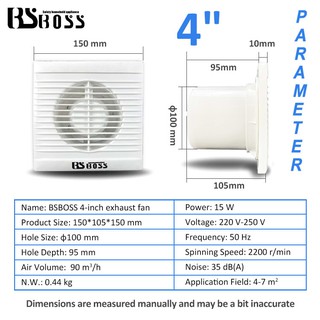
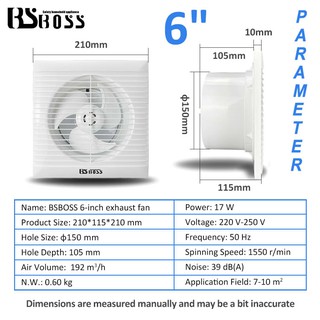
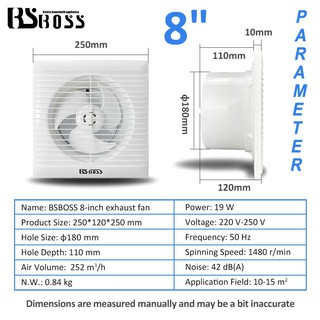


4” /6” 8” bathroom exhaust fan Gale/Mute/Ultra-thin/Energy saving 4”parameter Name: BSBOSS 4-inch exhaust fan Product Size: 150*105*150 mm Hole Size: φ100 mm Hole Depth: 95 mm Power: 15 W Voltage: 220 V-250 V Frequency: 50 Hz Spinning Speed: 2200 r/min Air Volume: 90 m3/h Noise: 35 dB(A) Application Field: 4-7 m2 N.W.: 0.44 kg Application: kitchen, bathroom, office and other exhaust places ... 6”parameter Name: BSBOSS 6-inch exhaust fan Product Size: 210*115*210 mm Hole Size: φ150 mm Hole Depth: 105 mm Power: 17 W Voltage: 220 V-250 V Frequency: 50 Hz Spinning Speed: 1550 r/min Air Volume: 192 m3/h Noise: 39 dB(A) Application Field: 7-10 m2 N.W.: 0.60 kg Application: kitchen, bathroom, office and other exhaust places ... 8”parameter Name: BSBOSS 8-inch exhaust fan Product Size: 250*120*250 mm Hole Size: φ180 mm Hole Depth: 110 mm Power: 19 W Voltage: 220 V-250 V Frequency: 50 Hz Spinning Speed: 1480 r/min Air Volume: 252 m3/h Noise: 42 dB(A) Application Field: 10-15 m2 N.W.: 0.84 kg Application: kitchen, bathroom, office and other exhaust places ... *Check valve device Can effectively prevent dust, cotton wool, flying insects, rain and other intrusions. Prevent outdoor air circulation 1.Prevent rainwater from entering 2.Prevent reptiles from entering 3.Prevent flying insects from entering *Installation matters Glass window installation 1. Punch a hole in the glass window where the exhaust fan is to be installed. The hole size refers to the hole size in the size table 2. Pick up the body, loosen the front shell screws, and then remove the front shell. 3. Put the middle machine base into the glass mounting hole, and fix it with screws to lock the middle machine base. 4.Cover the front shell and tighten the front shell screws Wall mount 1. Punch a hole in the wall where the exhaust fan is to be installed, please refer to the size table for the size of the hole 2. Loosen the front shell of the fuselage, and then remove the front shell 3. Put the intermediate machine base into the mounting hole, pull the intermediate machine base, and then fix the positioning hole of the intermediate machine base 4. Remove the middle machine base, drill a positioning hole with an electric drill, and then nail the positioning hole 5. Put the middle machine base back into the mounting hole and lock it with screws 6. Cover the front shell and tighten the front shell screws Note: All the above unified actual data vary due to the test environment, and the actual data shall prevail. Please refer to our table measurement to check on our product size. And due to hand measurement, it might be 1-2cm slightly different. ⚠️NOTE T&C: **Please check with us if you have any inquiry.** **Please check the size before buying. If the purchased size is incorrect, you can replace the product, but the shipping cost of the replacement product is borne by you** **Please let us